Next.js by Vercel - The React Framework
Initialization
npx create-next-app@latest app-name
Router
- App Router (v.13+): The newer, recommended routing system based on the app directory that supports shared layouts, nested routing, and more.
- Pages Router (old): The traditional routing system based on the pages directory that handles routes through the next/router
useRouterhook.
Page
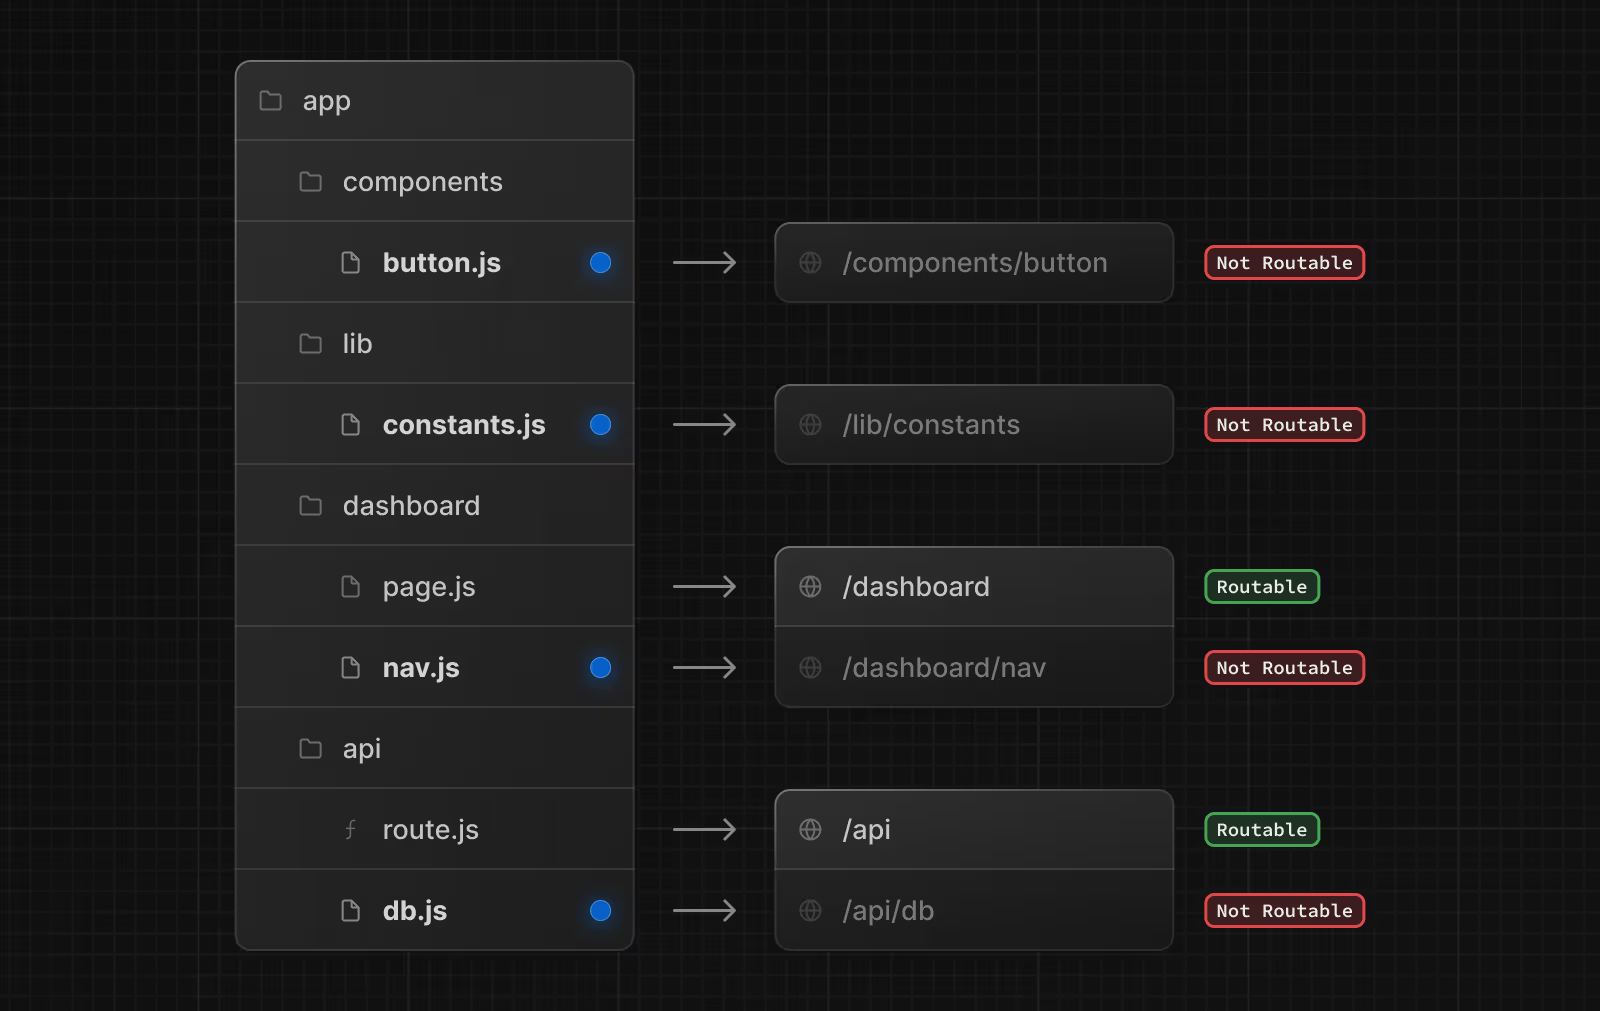
page.jsfiles allows you to define UI that is unique to a route.- Next.js supports pages with dynamic routes. For example, if you create a file called
pages/posts/[id].js, then it will be accessible atposts/1,posts/2, etc.
export default function Page({
  params,
  searchParams
}: {
  params: Promise<{ slug: string }>;
  searchParams: Promise<{ [key: string]: string | string[] | undefined }>;
}) {
  return <h1>My Page</h1>;
}
Layout
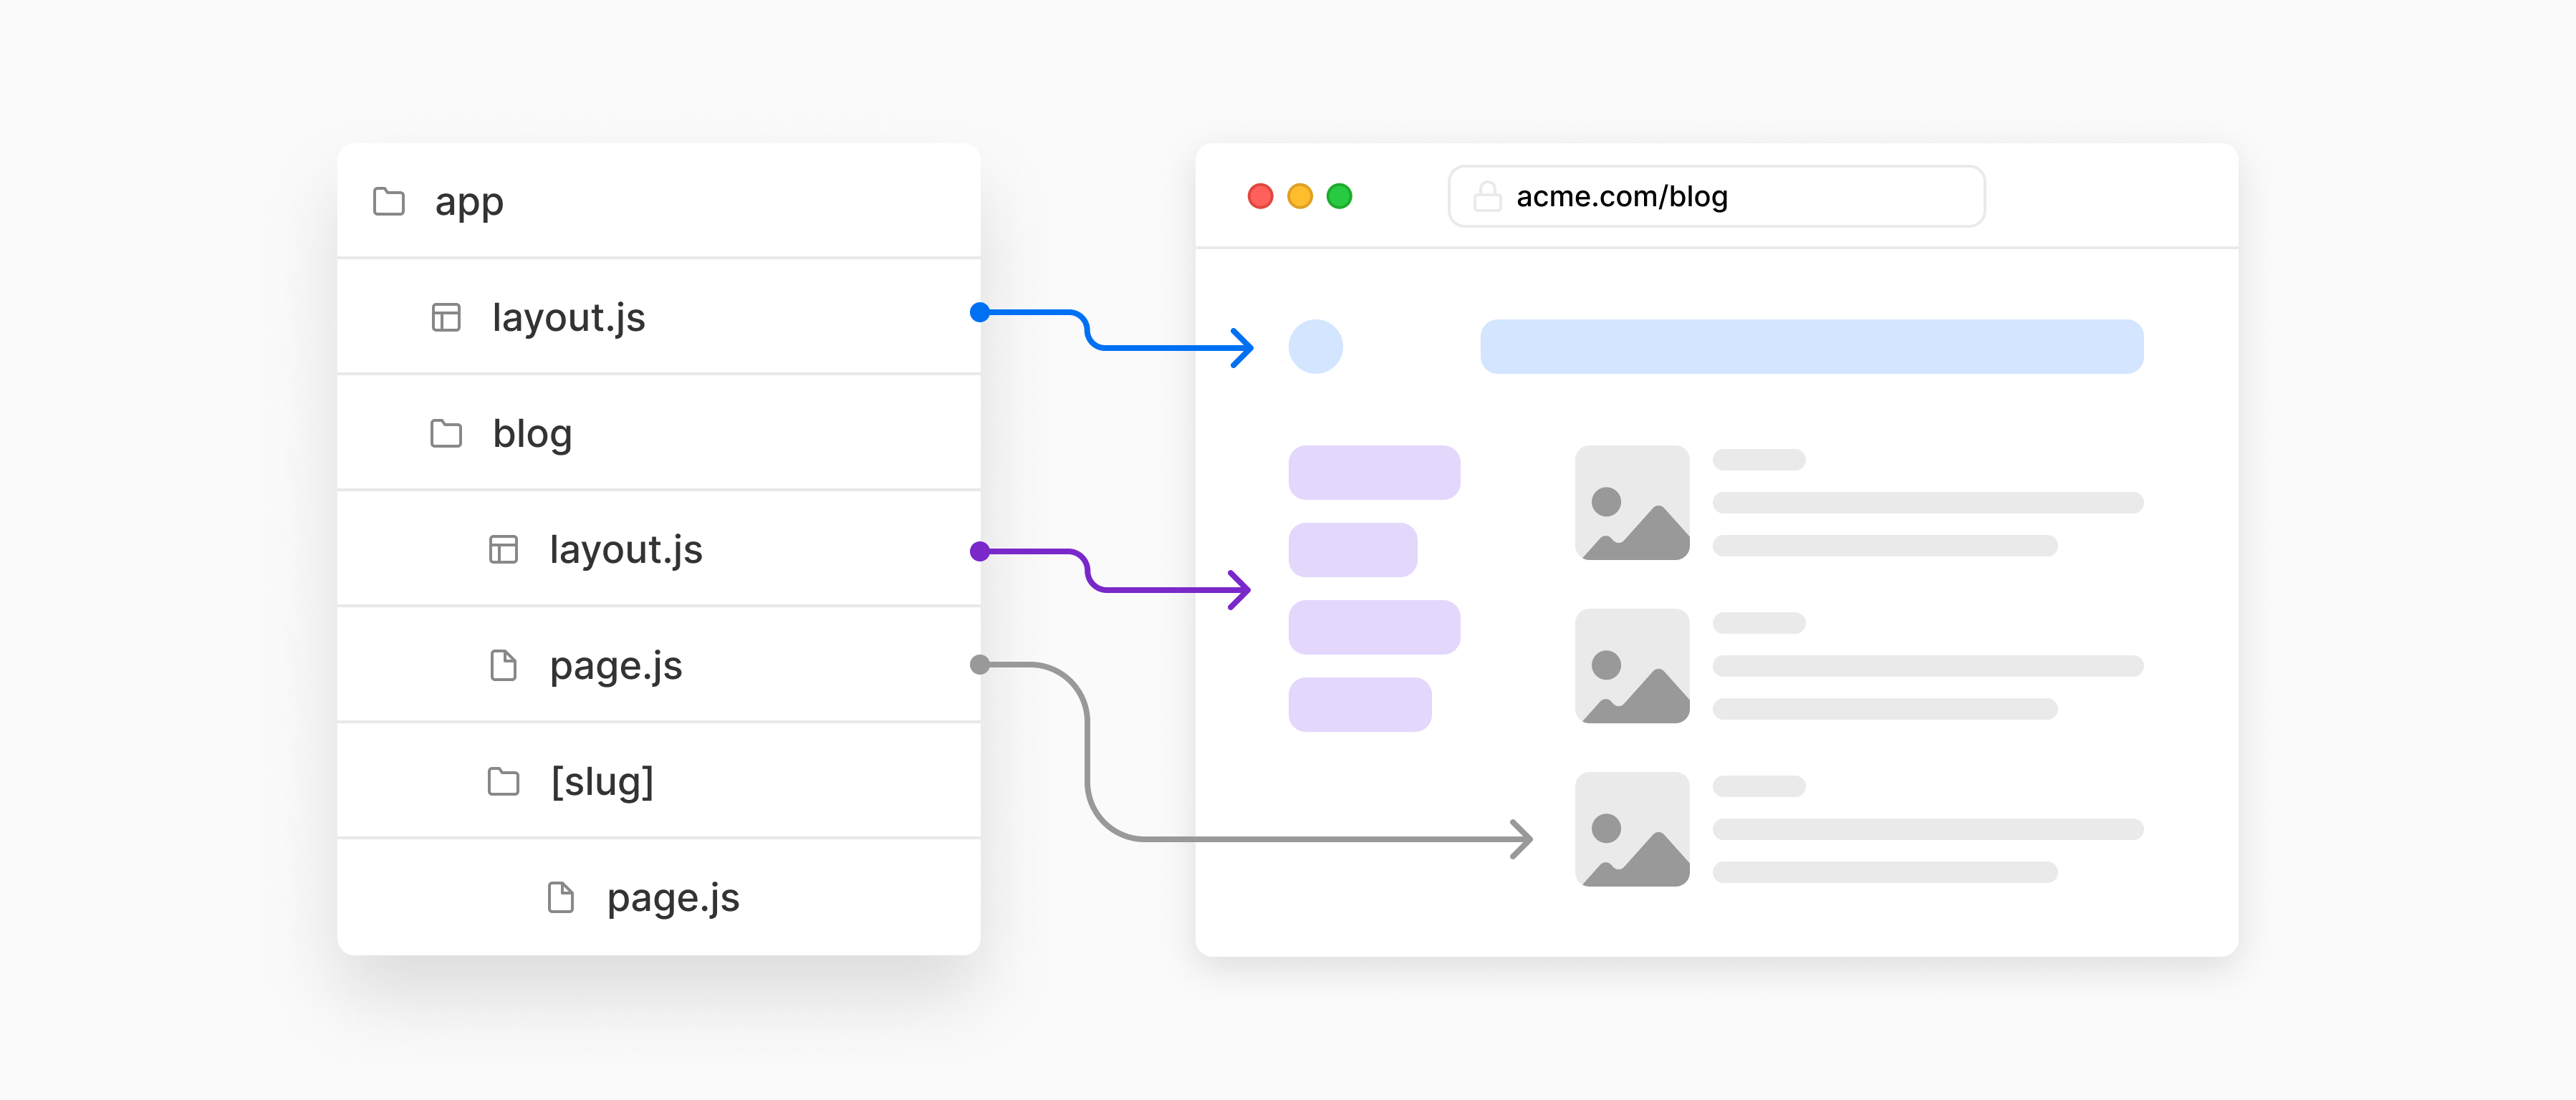
- A
layout.jsfile allow you to share UI elements like headers, navigation, or footers across multiple pages. - Nested layouts can be created by placing layout.js files in subfolders, allowing for layout composition
Loading
A loading.js file can create instant loading states built on Suspense. By default, this file is a Server Component - but can also be used as a Client Component through the "use client" directive.
export default function Loading() {
  // Or a custom loading skeleton component
  return <p>Loading...</p>;
}
Not Found
The not-found.js file is used to render UI when the notFound function is thrown within a route segment. Along with serving a custom UI, Next.js will return a 200 HTTP status code for streamed responses, and 404 for non-streamed responses.
import Link from "next/link";

export default function NotFound() {
  return (
    <div>
      <h2>Not Found</h2>
      <p>Could not find requested resource</p>
      <Link href="/">Return Home</Link>
    </div>
  );
}
Import Alias
In Next.js, you can set up aliases for directories to simplify import statements by
configuring the paths property in the tsconfig.json or jsconfig.json
{
  "compilerOptions": {
    "baseUrl": ".",
    "paths": {
      "@components/*": ["components/*"],
      "@utils/*": ["utils/*"],
      "@styles/*": ["styles/*"]
    }
  }
}
// Before
import Header from "../../components/Header";

// After
import Header from "@components/Header";
Server Side Rendering (SSR)
This is the default rendering method on Next.js, where pages are generated on the server for each request. This approach provides better SEO, faster First Contentful Paint (FCP), and improved performance for content-heavy applications.
React Servers Components
They combine the best of SSR and client-side interactivity. They allow components to run on the server, reducing the JavaScript bundle size sent to the client while maintaining rich interactivity where needed. Key benefits include:
- Automatic code splitting and reduced client-side JavaScript
- Direct access to backend resources without client-side APIs
- Better performance through reduced client-server waterfalls
// Server Component
async function ServerComponent() {
  const data = await db.query("SELECT * FROM users");
  return <UserList users={data} />;
}
Client Side Rendering (CSR)
Client Side Rendering (CSR) is a rendering method where the initial HTML is minimal, and JavaScript is used to render the page content in the browser. In Next.js, CSR is typically used for highly interactive components or when SEO is not a primary concern. While CSR can provide a more dynamic user experience, it may result in slower initial page loads compared to server-side rendering methods.
“use client”
- The "use client" directive is a special comment that marks a boundary between server and client components in Next.js. When you add this directive at the top of a file, it indicates that the component and all its children should be rendered on the client side. This is particularly useful when you need to use browser APIs, handle client-side state, or implement interactive features that can't be executed on the server.
//Client Component
"use client";

import { useState } from "react";

export default function Counter() {
  const [count, setCount] = useState(0);

  return <button onClick={() => setCount(count + 1)}>Count: {count}</button>;
}
Static Site Generation (SSG)
- Its a rendering method where pages are generated at build time rather than on each request. This approach is ideal for content that doesn't change frequently, as it provides the fastest possible page loads and optimal SEO benefits. There are two ways to do this:
Force Static Rendering
- You can enforce fully static rendering by using the
dynamic = 'force-static'directive. This ensures that the page is generated at build time and never updated until the next build. This method is ideal for content that doesn't change, such as landing pages or archived blog posts.
export const dynamic = "force-static";

export default async function Page() {
  const res = await fetch("https://api.example.com/data");
  const data = await res.json();

  return <div>{data.message}</div>;
}
Incremental Static Regeneration (ISR)
- Is a hybrid rendering method that combines the benefits of static generation and SSR. Allows you to regenerate static pages at runtime by revalidating data at specified intervals and using its cache meanwhile. This approach is useful for pages that need periodic updates without requiring a full site rebuild.
export default async function Page() {
  // Data will be cached and revalidated every 60 seconds
  const data = await fetch("https://api.example.com/data", {
    next: {
      revalidate: 60
    }
  });

  return <main>{data.title}</main>;
}
Lets you wrap components that may need to wait for data to load. It provides a declarative way to handle loading states in your React applications. Key benefits include:
- Shows fallback UI (like loading spinners) while content loads
- Coordinates multiple loading states across the component tree
- Prevents "waterfalls" by loading multiple components in parallel
import { Suspense } from "react";

export default function Page() {
  return (
    <Suspense fallback={<Loading />}>
      <SlowComponent />
    </Suspense>
  );
}
Metadata
Next.js has a Metadata API that can be used to define your application metadata (e.g. meta and link tags inside your HTML head element) for improved SEO. There are two ways you can add metadata to your app:
Static Metadata
import type { Metadata } from "next";

export const metadata: Metadata = {
  title: "Next.js App",
  description: "Example web app for my portfolio"
};

export default function Page() {}
Dynamic Metadata
import type { Metadata, ResolvingMetadata } from "next";

type Props = {
  params: Promise<{ id: string }>;
  searchParams: Promise<{ [key: string]: string | string[] | undefined }>;
};

export async function generateMetadata(
  { params, searchParams }: Props,
  parent: ResolvingMetadata
): Promise<Metadata> {
  // read route params
  const id = (await params).id;

  // fetch data
  const product = await fetch(`https://.../${id}`).then((res) => res.json());

  // optionally access and extend (rather than replace) parent metadata
  const previousImages = (await parent).openGraph?.images || [];

  return {
    title: product.title,
    openGraph: {
      images: ["/some-specific-page-image.jpg", ...previousImages]
    }
  };
}

export default function Page({ params, searchParams }: Props) {}
next/image
The <Image /> component is an extension of the HTML <img /> element, optimized for Next.js applications. It provides automatic image optimization features including:
- Automatic image resizing and optimization
- Lazy loading by default for better performance
- Prevents layout shift by enforcing size requirements
import Image from "next/image";

export default function Page() {
  return (
    <Image
      src="/profile.png"
      width={500}
      height={500}
      alt="Picture of the author"
    />
  );
}
next/font
- The next/font module provides built-in performance and font optimization features. It automatically hosts Google Fonts and custom fonts with zero layout shift, while also enabling self-hosting for improved privacy and performance. This module supports both variable and static fonts.
import { Inter, Lora, Source_Sans_3 } from "next/font/google";
import localFont from "next/font/local";

// define your variable fonts
const inter = Inter();
const lora = Lora();

// define 2 weights of a non-variable font
const sourceCodePro400 = Source_Sans_3({ weight: "400" });
const sourceCodePro700 = Source_Sans_3({ weight: "700" });

// define a custom local font where GreatVibes-Regular.ttf is stored in the styles folder
const greatVibes = localFont({ src: "./GreatVibes-Regular.ttf" });

export { inter, lora, sourceCodePro400, sourceCodePro700, greatVibes };
import { inter, lora, sourceCodePro700, greatVibes } from "../styles/fonts";

export default function Page() {
  return (
    <div>
      <p className={inter.className}>Hello world using Inter font</p>
      <p style={lora.style}>Hello world using Lora font</p>
      <p className={sourceCodePro700.className}>
        Hello world using Source_Sans_3 font with weight 700
      </p>
      <p className={greatVibes.className}>My title in Great Vibes font</p>
    </div>
  );
}
- To make it easier to access the font definitions in your code, you can define a path alias in your
tsconfig.jsonorjsconfig.jsonfiles as follows:
{
  "compilerOptions": {
    "paths": {
      "@/fonts": ["./styles/fonts"]
    }
  }
}
- You can now import any font definition as follows:
import { greatVibes, sourceCodePro400 } from "@/fonts";
next/scripts
The <Script /> component is an extension of the HTML <script /> tag that optimizes when and how scripts are loaded and executed. It provides several key features for script optimization:
- Automatic script loading prioritization based on page viewport
- Support for different loading strategies (beforeInteractive, afterInteractive, lazyOnload)
- Built-in performance optimization for third-party scripts
import Script from "next/script";

export default function Page() {
  return (
    <>
      <Script
        src="https://example.com/script.js"
        strategy="afterInteractive"
        onLoad={() => console.log("Script loaded")}
      />
    </>
  );
}
next/link
<Link> is a React component that extends the HTML <a> element to provide prefetching and client-side navigation between routes. It is the primary way to navigate between routes in Next.js.
-
It automatically handles prefetching pages in the background, optimizing the UX by making navigation feel instant. It also maintains the application state and scroll position during navigation.
-
Dynamic routes can be handled by passing dynamic segments in the href prop:
import Link from "next/link";

export default function HomePage() {
  return (
    <div>
      <h1>Welcome</h1>
      <Link href="/about">
        <a>Go to About Page</a>
      </Link>
    </div>
  );
}
next/cache
revalidatePath
Allows you to purge cached data on-demand for a specific path and its page or layout.
revalidatePath(path: string, type?: 'page' | 'layout'): void;
import { revalidatePath } from "next/cache";
revalidatePath("/blog/post-1");
next/navigation
redirect
- Allows you to redirect the user to another URL.
redirect(path: string, type?: 'redirect' | 'push'): void;
- By default,
redirectwill usepush(adding a new entry to the browser history stack) in Server Actions andreplace(replacing the current URL in the browser history stack) everywhere else. You can override this behavior by specifying thetypeparameter. Thetypeparameter has no effect when used in Server Components.
usePathname
- A client-side hook that returns the current URL pathname. Useful for tracking the current route, implementing active link states, or triggering effects based on route changes. It's commonly used alongside other navigation hooks for building dynamic navigation interfaces.
"use client";

import { usePathname } from "next/navigation";

export default function Navigation() {
  const pathname = usePathname();

  return (
    <nav>
      <Link href="/" className={pathname === "/" ? "active" : ""}>
        Home
      </Link>
    </nav>
  );
}
useRouter
This hook provides client-side routing capabilities by enabling programmatic navigation, access to router events and manipulation of URL parameters. It’s particularly useful when you need to handle navigation programmatically or respond to route changes in your components.
- The
router.push()method adds a new entry to the browser's history stack, allowing users to navigate back to the previous page using the browser's back button. This method is particularly useful when you need to handle navigation after certain events or conditions are met, such as form submissions or user interactions. - The
router.back()method navigates to the previous page in the browser's history stack, similar to clicking the browser's back button.
"use client";

import { useRouter } from "next/navigation";

export default function NavigationButtons() {
  const router = useRouter();

  return (
    <div>
      <button onClick={() => router.push("/dashboard")}>Go to Dashboard</button>
      <button onClick={() => router.back()}>Go Back</button>
    </div>
  );
}
- The
router.replace()method is similar torouter.push(), but it replaces the current history entry instead of adding a new one. This means that clicking the browser's back button won't return to the previous page. This is particularly useful for login/logout flows or when you want to prevent users from navigating back to a specific state.
"use client";

import { useRouter } from "next/navigation";

export default function LoginForm() {
  const router = useRouter();

  const handleLogin = async () => {
    // After successful login
    router.replace("/dashboard"); // User can't go back to login page
  };
}
useSearchParams
- This hook allows you to access and manipulate URL search parameters within your client components. This is particularly useful for handling query parameters in your application's routing and state management.
"use client";

import { useSearchParams } from "next/navigation";

export default function SearchBar() {
  const searchParams = useSearchParams();
  const search = searchParams.get("q");

  return <div>Search query: {search}</div>;
}
params
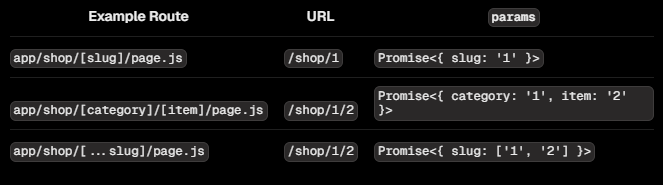
- A promise that resolves to an object containing the dynamic route parameters from the root segment down to that page. They are automatically passed to RSC as props.
export default async function Page({
  params
}: {
  params: Promise<{ slug: string }>;
}) {
  const slug = (await params).slug;
}
searchParams
- In RSC the
searchParamsare automatically passed as prop to pages and layouts. This prop provides convenient access to the current URL's search parameters, enabling server-side handling of query parameters and dynamic content generation based on URL parameters. It's particularly useful for implementing features like pagination, filtering, and search functionality directly on the server side without client-side JavaScript.
http://localhost:3000/search?page=2&query=example
export default async function Page({ searchParams }) {
  const currentPage = Number(searchParams?.page) || 1;
  const query = searchParams?.query || "";

  return (
    <div>
      <h1>Search Results</h1>
      <Table query={query} page={currentPage} />
    </div>
  );
}
Server Actions
- Server Actions are asynchronous functions that are executed on the server. They can be called in Server and Client Components to handle form submissions and data mutations in Next.js applications.
- A Server Action can be defined with the React
"use server"directive. You can place the directive at the top of anasyncfunction to mark the function as a Server Action, or at the top of a separate file to mark all exports of that file as Server Actions.
export default function Page() {
  async function create() {
    // Server Action
    "use server";
    // Mutate data
  }
  return "...";
}
"use server";

export async function create() {}
- Then you can use them in client components.
"use client";

import { create } from "@/app/actions";

export function Button() {
  return <button onClick={() => create()}>Create</button>;
}
- For example a Form component:
export default function Page() {
  async function createInvoice(formData: FormData) {
    "use server";

    const rawFormData = {
      customerId: formData.get("customerId"),
      amount: formData.get("amount"),
      status: formData.get("status")
    };

    sql`
      INSERT INTO invoices (customer_id, amount, status)
      VALUES (${rawFormData.customerId}, ${rawFormData.amount}, ${rawFormData.status});
    `;
    revalidatePath("/invoices"); //We need to revalidate the path as the data has changed
  }

  return <form action={createInvoice}>...</form>;
}
Prisma
- First we install Prisma and initialize it
npx i prisma -D
npx prisma init --datasource-provider sqlite
- We create a
Noteexample model
// prisma/schema.prisma
//...

model Note {
  id Int @id @default(autoincrement())
  title String
  content String?
  createadAt DateTime @default(now())
  updatedAt DateTime @updatedAt
}
- Now we can generate a SQL migration file based on
prisma/schema.prismaensuring both database and Prisma schemas are synchronized.
npx prisma migrate dev --name init
- We set up a singleton Prisma client to avoid creating multiple database connections, especially during hot-reloading in development.
// src/libs/prisma.ts
import { PrismaClient } from "@prisma/client";

declare global {
  // eslint-disable-next-line no-var
  var prisma: PrismaClient | undefined;
}

export const db = global.prisma || new PrismaClient();

if (process.env.NODE_ENV !== "production") global.prisma = db;
- Then we can use it like this
// app/api/notes/[id]/route.ts

import { db } from "@/libs/prisma";

export async function GET(request: Request, { params }: Params) {
  try {
    const note = await db.note.findFirst({
      where: { id: Number(params.id) },
    });
    //...
 }
- And see the database changes with the Prisma studio
npx prisma studio
next-auth
- First we install next-auth
npm i next-auth
- Then we configure our enviromental variables
// .env

NEXTAUTH_URL = "http://localhost:3000";
NEXTAUTH_SECRET = "mysecret";
- And set up our credential-based authentication
// app/api/auth/[...nextauth]/route.ts

import NextAuth from "next-auth";
import CredentialsProvider from "next-auth/providers/credentials";

export const authOptions = {
  providers: [
    CredentialsProvider({
      name: "Credentials",
      credentials: {
        email: {
          label: "Email",
          type: "text",
          placeholder: "[email protected]"
        },
        password: {
          label: "Password",
          type: "password",
          placeholder: "******"
        }
      },
      async authorize(credentials) {
        //... Validate email and password then return the user or an error
      }
    })
  ],
  pages: {
    signIn: "/auth/signin"
  }
};

const handler = NextAuth(authOptions);

export { handler as GET, handler as POST };
- Now we can define a sign-in page for user authentication using NextAuth’s
signInfunction
// app/auth/signin/page.tsx

"use client";
import { signIn } from "next-auth/react";

function SignInPage() {
  const onSubmit = handleSubmit(async (data) => {
    const res = await signIn("credentials", {
      redirect: false,
      email: data.email,
      password: data.password,
    });
    if (res?.ok) {
      router.push("/dashboard");
      router.refresh();
    } else {
      setError(res?.error);
    }
  });

  return (
    <div>
      <form onSubmit={onSubmit} >
//...
- And we create a middleware to protect specific routes, ensuring previous authentication.
// src/middleware.ts

export { default } from "next-auth/middleware";

export const config = {
  matcher: ["/dashboard/:path*"]
};
UI Component Libraries
- shadcn
- NextUI
Internationalization
- next-translate
- 18next
- next-18n
Markdown
Architectures
Monolith
- A monolithic architecture in Next.js refers to a traditional, single-codebase approach where all components, pages, and functionality are contained within one application. This approach is simpler to develop and deploy, making it ideal for small to medium-sized applications. Key benefits include easier debugging, simpler development workflow, and straightforward deployment process. It be managed in a monorepo or even split into multiple repositories that still function as a monolith.
/src
/app
/api
/page.tsx
/cart
/page.tsx
/components
/ProductList.js
/CartSummary.js
/db
 /lib
/models
/hooks
/styles
Feature-Slice Design
- Feature-Slice Design (FSD) is an architectural methodology that organizes code by business domains or features rather than technical layers. In Next.js applications, this approach helps maintain scalability and separation of concerns by grouping related functionality together. Each feature is isolated with its own components, logic, and styles, making the codebase more maintainable and easier to navigate.
/src
/features
/auth
/components
/api
/hooks
/models
/products
/components
/api
/hooks
/cart
/components
/api
/hooks
/shared
/ui
/lib
/api
Monorepo
- A monorepo architecture in Next.js involves managing multiple related projects or packages within a single repository. This approach is particularly useful for large-scale applications where code sharing and dependency management across multiple services or packages is crucial. Monorepos enable better code reuse, simplified dependency management, and coordinated versioning across projects.
/
/apps
/web
/mobile
/admin
/packages
/ui-components
/utils
/config
/tools
/scripts
/testing
Resources
https://www.youtube.com/watch?v=jMy4pVZMyLM&list=PLTHsJ1otlcc-Xfz5DyrQe7dC1YynTjSnn&index=15
https://www.youtube.com/watch?v=m6KESRxAdK4&list=PLTHsJ1otlcc-Xfz5DyrQe7dC1YynTjSnn&index=16
https://www.youtube.com/watch?v=_SPoSMmN3ZU&list=PLTHsJ1otlcc-Xfz5DyrQe7dC1YynTjSnn&index=39
https://www.youtube.com/watch?v=AdkNcFUsRQQ&list=PLTHsJ1otlcc-Xfz5DyrQe7dC1YynTjSnn